Relay Outgoing Emails with Microsoft Exchange
The easiest way to use Microsoft Exchange to relay emails for LiquidFiles is to enable the setting to "Use Email Sender Address for all emails" in Admin → Configuration → Email.
If you don't want to use this setting, you will need to configure your Microsoft Exchange server to allow sending using any From address and any To address. Please follow the configuration below to set enable this configuration.
Apart from providing a solution to supporting authenticated SMTP for your external users this method should also give you a better understanding of how the receive connectors work now.
Another situation where you may need to use them is to provide an anonymous relay service for internal systems, for example photocopier/scanner units that support basic email but no authentication. Note that you will only need an anonymous relay if your device needs to email outside your domain - internal emails will not be a problem.
An incorrectly configured anonymous relay can leave you open to being used as an email server by spammers, which in turn will get you blacklisted so you can't email anyone anymore. Therefore you should approach with extreme caution and I strongly recommend you test your server with a relay check utility such as www.mxtoolbox.com
This time you need to create yourself a new receive connector so return to your Server Hub Transport section in the Exchange Management Console:
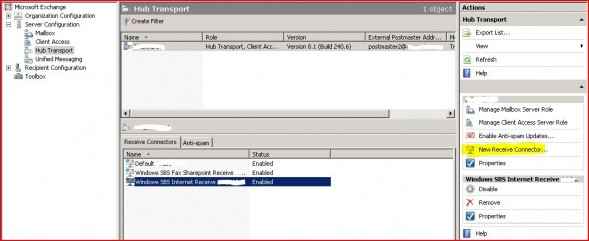
Click New Receive Connector to start the wizard and on the first page enter a suitable name, then select Custom from the drop-down menu. Configure the connector with the same Authentication settings as before but only Anonymous Users allowed, then in the Network section just add the IP addresses of the devices you wish to allow anonymous relay rights to. Make sure you get this last part right! Now by default anonymous users do not have the rights to submit email for external domains so we need to grant them, and this has to be done through the Exchange Management Shell. Enter the following commands:
Get-ReceiveConnector "connector name" | Add-ADPermission -User "NT AUTHORITY\ANONYMOUS LOGON" -ExtendedRights "ms-Exch-SMTP-Accept-Any-Recipient"
Get-ReceiveConnector "connector name" | Add-ADPermission -User "NT AUTHORITY\ANONYMOUS LOGON" -ExtendedRights "ms-Exch-SMTP-Accept-Any-Sender"
Make sure you enter the connector name as it appears in the Management Console and run the command, it should confirm the permission has been added. As before make sure you restart the Transport Service and then test your new connector, and don't forget the open relay test to be sure!