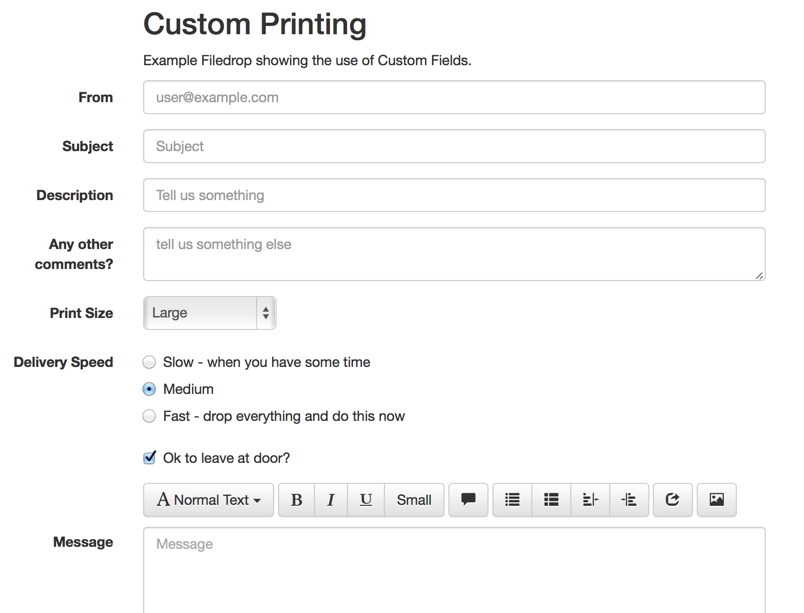
Filedrop Custom Fields
Starting with LiquidFiles v2.6, it is now possible to add custom fields to Filedrops. This is for instance if you're setting up a Filedrop for a print shop and want to be able to specify print size and similar.
The easiest way to see how this works is probably just dive in with an example. If you enter the custom fields like this:
Description: text("Tell us something"), required, validate("[a-zA-Z0-9]{3,}", "Need to contain letters and numbers only.")
Any other comments?: textarea("tell us something else"), required
Print Size: select("Small", "Medium", "*Large"), class("col-lg-2")
Delivery Speed: radio("Slow - when you have some time", "*Medium", "Fast - drop everything and do this now")
Ok to leave at door?: checkbox(checked)
It will produce fields like this:
Overview
As a very basic overview:
The custom field values will be pre-pended to the message when created. So you'll see all the custom fields at the top of the email you'll receive when someone submits this form.
Each line in the custom fields will produce a custom form field. So if you want 3 custom fields, that's 3 lines of configuration.
The overall syntax is:
Label: field_type(field_type_options), field_options
Field Types
Currently we support text fields, text areas, selects, radio buttons and check boxes
Text Fields
A minimal example would be:
Description: text()
A more in depth text field example like above is:
Description: text("Tell us something"), required, validate("[a-zA-Z0-9]{3,}", "Need to contain letters and numbers only.")
where:
- Description: the label that will be displayed at the left of the text field.
- text: the field type text
- "tell us something": This is the placeholder, a hint to the user what they are supposed to enter in this field (optional).
- required: is a keyword. If you add required as a field option, this will be a required field.
- validate("[a-zA-Z0-9]{3,}", "Need to contain letters and numbers only.") - Custom validation. We'll break this down further.
- "[a-zA-Z0-9]{3,}": This is a regular expression that this field must pass. In this example you need to enter at least 3 of the characters a-zA-Z0-9.
- "Need to contain letters and numbers only.": This is the error message that will be displayed if the validation fails.
A special note on email. If you want to add a separate email address field for some reason and you want to validate this as an email address. It's almost impossible to do client side validation of email addresses these days. Feel free to do a web search for a regular expression to use. Most people seems to recommend simply checking for the presence of `@`:
Another Email: text("user@company.com"), required, validate("@", "Please enter a valid email address.")
Please note that any validation is client side (JavaScript) only.
Text Area Fields
Very similar to above. The only difference is visible in this example:
Comment: textarea("Tell us something", 80x5)
Where 80x5 is the columns and rows to display for this texture. Please see the form width section below for more information on the columns display.
All other options are identical to the text field above.
Select Fields
A select is a drop down selector that can be configured with:
Print Size: select("Small", "Medium", "*Large")
In this example, Small, Medium and Large are the different options. Feel free to add as many as you need. If you add a star (*), this will be the default selected field. With no star, the first field will be the default field.
Radio Buttons
Radio buttons are buttons where you can only select one in a set. An example would be:
Delivery Speed: radio("Slow", "*Medium", "Fast")
Slow, Medium and Fast are the different options. If you add a star (*) to any of the options, this will be selected on default. If there's no star, no value will be pre-selected.
Checkboxes
Checkboxes are simple on/off selectors, configured like:
Ok to leave at door?: checkbox(checked)
The label in a checkbox is the only one that is not displayed to the left of the field. Please see the example screenshot above.
The only option is if you want the checkbox to be selected on default or not. If you add "checked" as in the example above, the checkbox will be selected on default. Without "checked", the checkbox will not be selected on default.
Validations
There's two validations available. A simple "required" which makes the field a required field. And a custom validation that uses regular expressions. You can add "required" to any field, but it only really makes sense for text fields, text areas and radio buttons (if you don't have a default value).
With the regular expression validation, you can add an error message if the validation fails. Please see this example:
Description: text("Tell us something"), required, validate("[a-zA-Z0-9]{3,}", "Need to contain letters and numbers only.")
"[a-zA-Z0-9]{3,}" is the regular expression that this field is validated against when submit is pressed.
"Need to contain letters and numbers only." is the error message that will be displayed if the regular expression validation fails. This can be any string.
Please note that validation is client side (JavaScript) only. If someone disables JavaScript in their browser, this validation will fail. But then a lot of other things will fail as well and it's unlikely that they will be able to send any files.
Advanced Custom Validation
It is possible to use advanced custom validations if you're comfortable programming in JavaScript. LiquidFiles uses the jQuery Validation Plugin (http://jqueryvalidation.org) for it's validations. And you can have a look at: https://github.com/jzaefferer/jquery-validation/tree/master/src/additional to see some examples of custom validations of what you can add.
The easiest way to do this is to add a custom class to the field(s) you want to apply the custom validation to and then use the $.validator.addMethod method as documented here: http://jqueryvalidation.org/jQuery.validator.addMethod/.
To see a working example of custom validation, please see the recruitment form example below.
Additional Description
If you want to add some additional description, you can add a text block anywhere using the following format:
help_text: "Some Additional help text"
if you want to write help text on its own line, or as part of another form field statement like:
Description: text("Tell us something"), help_text("Some Additional help text")
You can add help_text to any field.
Raw HTML
If you want to add something more fancy, you can use the raw_html format like the following:
raw_html: <div class='col-lg-8 offset-lg-2'><div class='alert alert-info'>Some highlighted description</div></div>
Anything after raw_html: will be inserted just as is in the custom filedrop. If you enclose your html in the first div above, everything will align with the form field like: <div class='col-lg-8 offset-lg-2'>YOUR HTML</div>
Field Widths
LiquidFiles uses Bootstrap (http://getbootstrap.com) as its main interface library. By default, all forms are displayed to their full width. But you can change this if you want.
A quick background is that each page is divided into 12 colums. The label to the left occupies 2 columns and the form field to the left will then occupy 8 columns, with 2 empty columns to the right, to make the form look nicer. This is for desktop size only. On phones and tablets, the interface will place the labels on top and display form fields in full width. Depending on the desktop size, each column will be a different size so if you decide to change the width please make sure that you rezise the browser window to make sure everything displays how you intend it to.
If you wish to use a narrower select for instance, you can use:
Print Size: select("Small", "Medium", "*Large"), class("col-lg-2")
Where class sets the class for the form field (you can set any class if you're into custom JavaScript and Stylesheets) and col-lg-2, sets that this field should use 2 colums. You can use any value here between 1 and 10, but a value between 2 and 8 is likely going to produce the best result. Feel free to try out the different widths to see which one is the best for each field if you don't want to use the default width.
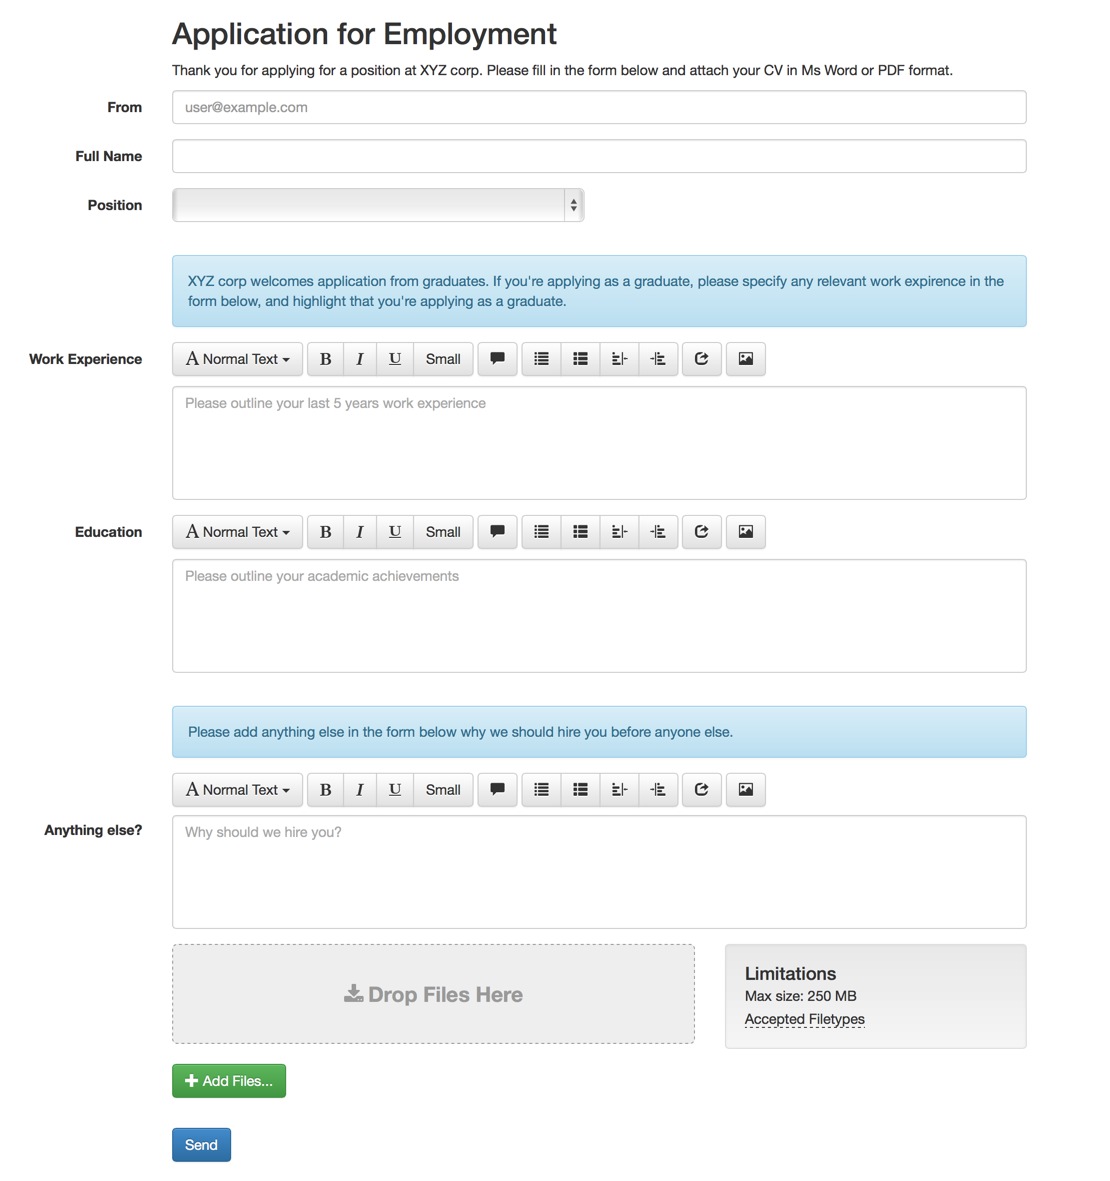
Example: Recruitment form
In the following example, we're going to look at a complete example to create a nice looking recruitment form using the Filedrops with custom fields.
Basic configuration
There's nothing special in the the basic configuration:
- Name: recruitment
- Title: Application for Employment
- Description: Thank you for applying for a position at XYZ corp. Please fill in the form below and attach your CV in Ms Word or PDF format.
- Expires After: 14
- Max File Size: 20Mb
- Recipient: head_recruitment@yourcompany.com
- Send Download Receipts to Filedrop Recipient: yes
- Send Download Receipts to Sender: yes
- Download Permission: Only Specified Recipients
- Permitted Extensions: doc, docx, pdf
Custom Fields
This is where it gets a bit fun, please see the following:
Full Name: text(), required
Position: select('', 'JavaScript Developer', 'Web Designer'), class('col-lg-4 my_validation_position')
raw_html: <div class='col-lg-8 offset-lg-2'><div class='alert alert-info'>XYZ corp welcomes application from graduates. If you're applying as a graduate, please specify any relevant work expirence in the form below, and highlight that you're applying as a graduate.</div></div>
Work Experience: textarea(Please outline your last 5 years work experience, 80x5), required, class('col-lg-8 html_editor')
Education: textarea(Please outline your academic achievements, 80x5), required, class('col-lg-8 html_editor')
raw_html: <div class='col-lg-8 offset-lg-2'><div class='alert alert-info'>Please add anything else in the form below why we should hire you before anyone else.</div></div>
Where each line means:
- Full Name: The full name, a required field
- Position: A dropdown select list of available positions. We've made the field half the page width and added a class to use with a custom validation.
- This raw html will display a nice blue notice section outlining some description for the field below.
- Work Experience: The interesting part of this textarea is that we've added a html_editor class. This will load the html editor for this field.Please note that the html editor does not handle placeholders. If html editor is enabled the placeholer in the text area will not be displayed
- Education: Same as work experience.
- The final raw html outlines some description for the original message (that we'll change the description of in the next section).
Custom JavaScript / the finishing touches
Custom JavaScript is a very powerful tool to change pretty much anything on a web page. It is a programming language though and as with anything similar, you need to understand JavaScript programming (or engage a JavaScript developer) to make full use of it. The example below should serve as an example and any seasoned web/javascript developer will be able to assist you customizing your form to your requirements.
$(function() {
  $('#message_subject').parent().parent().addClass('hide');
  $('#message_email').blur(function() {
    $('#message_subject').val('Requirement Request from: ' + $('#message_email').val());
  });
  $('#message_message').parent().parent().find('label').text('Anything else?');
  $('#message_message').attr('placeholder', 'Why should we hire you?').attr('rows', 5);
  $.validator.addMethod("my_validation_position", function(value, element) {
    if (value.length > 0) { return true } else { return false }
  }, "Please select a position");
});
Where each line means:
- The first and last line encloses everything else in a function. This will make everything enclosed to be evaluated after the page has completely loaded by the browser.
- This will hide the Subject field.
- This will set the Subject field to "Recruitment Request From: " and whatever the sender has entered as their email address (when they have finished editing the email from field). We want this to be automatic as it is hidden from the user (line 2)
- ...continued
- ...continued
- This will rewrite the Message label to read "Anything else?"
- This will rewrite the Message placeholder to read "Why should we hire you?" and set the size to be 5 rows (same as the other text areas above).
- The custom validation will attach itself to any field with a "my_validation_position" class and will check if the value is empty (has a length > 0) or not. Since the select form in the example has 3 options where the first and default one is empty. If this empty selector is selected it will trigger this validation and the "Please select a position" message will be displayed next to the field.
- ...continued
- ...continued
Result
If you've entered everything as above, you should now have a form that looks very similar to: