Network and Firewall connections
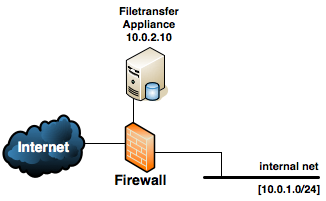
This diagram depicts a typical deployment in a small environment where LiquidFiles has been deployed in a DMZ using the private ip address 10.0.2.10. We have one internal network of 10.0.1.0/24 and one firewall that is also the default gateway (default router) for all networks.
Network Connections
The following table outlines the network connections that the LiquidFiles requires to operate (IP addresses assumed to be as in the network diagram above).
| Protocol / Function | source | destination | port | description |
|---|---|---|---|---|
| http(s) | any | 10.0.2.10 | 80 & 443 | http and https is allowed from anywhere. This is how all files are uploaded and downloaded and all normal user interaction is via http or https. |
| DNS | 10.0.2.10 | DNS server | 53 (UDP) | The appliance needs DNS to function properly. |
| 10.0.2.10 | any / email relay server | 25 | The appliance needs to send emails, either via an email relay server or directly to the Internet. | |
| updates | 10.0.2.10 | any | 443 | The appliance downloads updates over https. Please see the table below for a list of specific URLs that are being used. |
| admin | 10.0.1.0/24 | 10.0.2.10 | 222 | Use specific management ip's if you can for ssh access to the appliance. |
| LDAP | 10.0.2.10 | LDAP server | 389/636 | If LDAP authentication is enabled, the appliance needs connections to the LDAP server. |
| NTP | 10.0.2.10 | any / ntp server | 123 (UDP) | If NTP time synchronisation is enabled, if NTP pool authentication is enabled the destination needs to be any. |
| Emaildrop | any | 10.0.2.10 | 25 | If you have enabled Emaildrops. |
| FTPdrop (FTP) | any | 10.0.2.10 | 21, 44000-44100 | If you have configured FTPdrops and wish to use FTP. |
| FTPdrop (SFTP/SCP) | any | 10.0.2.10 | 22 | If you have configured FTPdrops and wish to use SFTP/SCP. |
In most cases, if deployed behind a firewall or similar, you will also need to configure the firewall for address translation — translating a public address to the private 10.0.2.10 address. You will also mostly certain need to configure DNS so that a published DNS points to the public ip address of the Filetransfer appliance.
Restricting outgoing https
The following table outlines all connections where LiquidFiles is using when connecting to the Internet.
| Function | Destination | Comment |
|---|---|---|
| Licenses/ Updates | https://license.liquidfiles.com/ | When installing/renewing licenses, the LiquidFiles system will validate its license with the license details stored at https://license.liquidfiles.com. Also, when performing updates, LiquidFiles will check available updates from https://license.liquidfiles.com. |
| Updates | https://updates.liquidfiles.com | Any LiquidFiles, System, AV Updates or Hotfixes will be downloaded from
https://updates.liquidfiles.com. Please note that https://updates.liquidfiles.com is using Amazon Cloudfront (global geo-caching). You will not be able to restrict this to specific IP addresses. |
| GeoIP Lookups | https://geoip.liquidfiles.com | If you have enabled GeoIP lookups, the LiquidFiles system will lookup IP → GeoIP locations to https://geoip.liquidfiles.com. |
| Support Info | https://files.liquidfiles.com | If you need to send Support Information (diagnostic information sometimes requested by LiquidFiles support), this will be sent from the LiquidFiles system to https://files.liquidfiles.com/. |
| Support Connection | tcp://access.liquidfiles.com:443 | If you need to enable the Support Connection (when requested by LiquidFiles support), this will establish a connection on TCP Port 443 to access.liquidfiles.com. Please note that eventhough this is using TCP Port 443, it is not using HTTPs so if you are using any content inspecting firewall or similar, you may need to disable HTTPs checking for the support connection to be able to be established. |
If required, you can also configure a Proxy in Admin → System → Network and that will make all outgoing connections use the proxy instead of going direct.